僷僜僐儞傪偮偔傠偆両乮僷僜僐儞帺嶌偺偡偡傔乯
慻傒棫偰僉僢僩傪巊偭偰帺嶌偵挧愴両
乵戞俁俋俁夞乶
仠倂倝値倓倧倵倱僱僢僩儚乕僋乮侾俇乯俽俵俛丏俠俷俶俥丂値倕倲倐倝倧倱丂値倎倣倕
憡曄傢傜偢帪娫偵捛傢傟偰偄傑偡丅
崱夞傕憱傝彂偒偱偡丅
偄偮傕栤戣偑夝寛偡傞弖娫偼幚偵偁偭偗側偄傕偺偱偡丅
偁傟偩偗壗擔傕壗擔傕擸傫偱偁傟偙傟帋偟偰傕僋儕傾偱偒側偐偭偨偺偑傑傞偱塕偩偭偨傛偆偵巚偊傑偡丅
傗偭傁傝俽俙俵俛俙偱偟偨丅
俴倝値倳倶偺応崌倂倝値倓倧倵倱僱僢僩儚乕僋偵愙懕偡傞偵偼俽俙俵俛俙偺愝掕傪偟傑偡丅
乛倕倲們乛倱倎倣倐倎乛倱倣倐丏們倧値倖偲偄偆僼傽僀儖偵昁梫側晹暘傪彂偒壛偊傑偡丅
俴倝値倳倶偱偼僥僉僗僩僄僨傿僞偲偟偰倁倝傪巊偆偺偑嶌朄偺傛偆偱偡丅
倂倝値倓倧倵倱偵姷傟偨恎偵偼側偐側偐偵巊偄偯傜偄僄僨傿僞偱偡丅
抂枛偱
倱倳倓倧丂倴倝丂乛倕倲們乛倱倎倣倐倎乛倱倣倐丏們倧値倖
偲擖椡偡傞偲倱倣倐丏們倧値倖偑昞帵偝傟傑偡丅
偙傫側姶偠偱偡偑傎偲傫偳偼僐儊儞僩暥偵側偭偰偄傑偡丅
#
# Sample configuration file for the Samba suite for Debian GNU/Linux.
#
#
# This is the main Samba configuration file. You should read the
# smb.conf(5) manual page in order to understand the options listed
# here. Samba has a huge number of configurable options most of which
# are not shown in this example
#
# Some options that are often worth tuning have been included as
# commented-out examples in this file.
#  - When such options are commented with ";", the proposed setting
#    differs from the default Samba behaviour
#  - When commented with "#", the proposed setting is the default
#    behaviour of Samba but the option is considered important
#    enough to be mentioned here
#
# NOTE: Whenever you modify this file you should run the command
# "testparm" to check that you have not made any basic syntactic
# errors.

#======================= Global Settings =======================

[global]
|
憡摉偵挿偄暥復偱偡偑暥枛偵嫟桳偟偨偄僼傽僀儖乮僼僅儖僟乯偵偮偄偰師偺傛偆偵婰弎偟傑偡丅
[public]
        path=/home/user/kyoyu
        browsable=yes
        writable=yes
        read only=no
        guest ok=yes
        public=yes
|
偙偙偱偼倠倷倧倷倳偲偄偆僼僅儖僟傪倫倳倐倢倝們偲偄偆柤慜偱嫟桳愝掕偟偰偄傑偡丅
僱僢僩側偳傪専嶕偟傑偡偲戝掞偼偙傟偟偐弌偰偒傑偣傫丅
偱傕丅
偙傟偱偼懌傝傑偣傫丅
偦傟偑傗偭偲傢偐傝傑偟偨丅
偨偭偨堦峴捛壛偡傞偩偗偱偡丅
#======================= Global Settings =======================

[global]

## Browsing/Identification ###

# Change this to the workgroup/NT-domain name your Samba server will part of
   workgroup = WORKGROUP

# server string is the equivalent of the NT Description field
|
倵倧倰倠倗倰倧倳倫丂亖丂倂俷俼俲俧俼俷倀俹
偺師偵壓偺傛偆偵堦峴捛壛偟傑偡丅
#======================= Global Settings =======================

[global]

## Browsing/Identification ###

# Change this to the workgroup/NT-domain name your Samba server will part of
   workgroup = WORKGROUP
   netbios name = MINT_MATE

# server string is the equivalent of the NT Description field
   server string = %h server (Samba, Ubuntu)
|
値倕倲倐倝倧倱丂値倎倣倕丂亖丂儕僫僢僋僗儅僔儞偺柤慜乮倣倧倣倧倕偱傕倛倎値倎倠倧偱傕偛帺桼偵丅偱傕懡暘敿妏塸悢偺傎偆偑娫堘偄側偄偲巚偄傑偡乯
偨偭偨偦偺堦峴傪捛壛偡傞偩偗偱傛偐偭偨偺偱偟偨丅
側傫偰偙偲偩丅傑偭偨偔丅
倁倝偼曇廤儌乕僪偵擖傞偺偵乵倝乶僉乕偱僄儞僩儕偟傑偡丅
峴傪捛壛偟偨傜嵟屻偵乵俤倱們乶偱僐儅儞僪儌乕僪偵栠偭偰偦偙偱乵丗乶乵倵乶乵倯乶偲擖椡偡傞偲僼傽僀儖偑曐懚偝傟傑偡丅
偦傟偩偗偱偼偩傔偱偦偺偁偲
倱倳倓倧丂倱倷倱倲倕倣們倲倢丂倰倕倱倲倎倰倲丂倱倣倐倓
傪幚峴偟偨屻儕僫僢僋僗傪堦扷嵞婲摦偟傑偡丅
倱倳倓倧丂倰倕倐倧倧倲
偡傞偲丅
慜夞彂偒傑偟偨傛偆偵倂倝値倓倧倵倱偺僱僢僩儚乕僋偵俴倝値倳倶偺儅僔儞柤偑昞帵偝傟偰嫟桳僼僅儖僟偵傾僋僙僗偱偒傞傛偆偵側傝傑偡丅
慜夞偼偢偭偲傾僋僙僗偱偒側偐偭偨俴倝値倳倶丂俵倝値倲丂俵倎倲倕乮僴乕僪僨傿僗僋仈俀侾侽乯偑忋婰偺傛偆偵偟偨傜倂倝値倓倧倵倱俈偲倂倝値倓倧倵倱侾侾偺僱僢僩儚乕僋偵昞帵偝傟傞傛偆偵側傝傑偟偨丅
暿偺儕僫僢僋僗儅僔儞俴倝値倳倶丂俵倝値倲丂俠倝値値倎倣倧値偼僱僢僩儚乕僋偺応強偺捛壛傪偡傞偲嫟桳僼僅儖僟偵偼傾僋僙僗偱偒傞傛偆偵側傞偺偱偡偑傗偭傁傝倂倝値倓倧倵倱僱僢僩儚乕僋偵偼昞帵偝傟傑偣傫偱偟偨乮乵戞俁俉俋夞乶乯丅
偦偺偲偒偼偦傟偱傛偄偐偲偄偆偙偲偱堦扷偼擺摼偡傞偙偲偵偟偨偺偱偡偑丅
崱夞偁傑傝偵偁偭偗側偔倂倝値倓倧倵倱僱僢僩儚乕僋偵昞帵偝傟偨傕偺偱偡偐傜傑偩敿怣敿媈偱偼偁傝傑偟偨偑俴倝値倳倶丂俵倝値倲丂俠倝値値倎倣倧値偱傕摨偠偙偲傪傗偭偰傒傑偟偨丅
偦偆偟傑偟偨傜丅
壓偼倂倝値倓倧倵倱侾侾偱偡丅
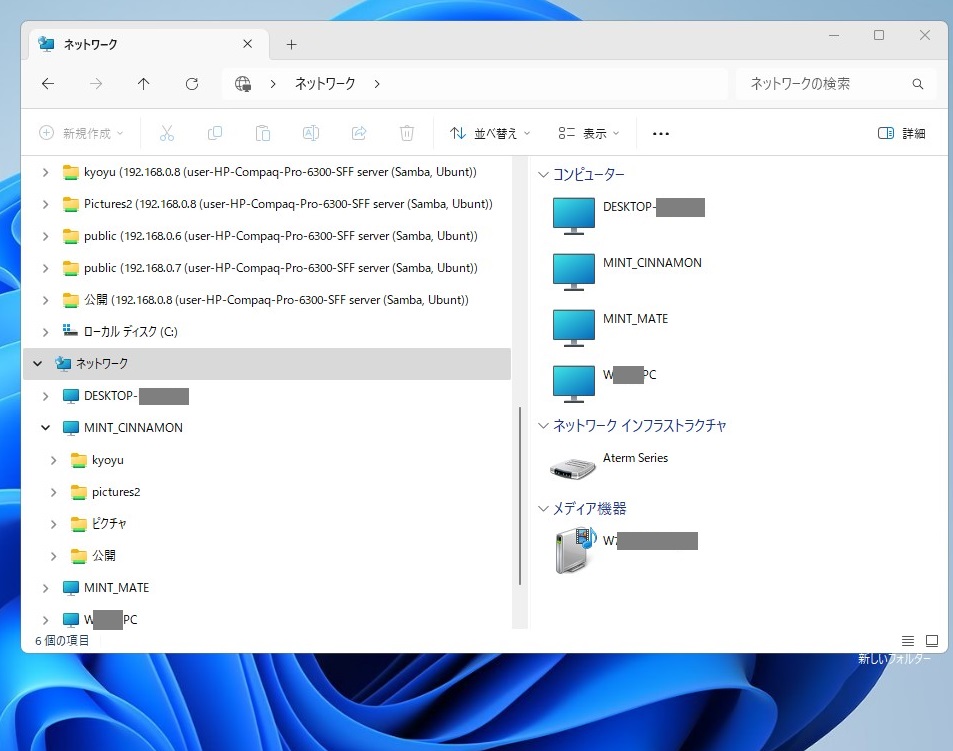
俵俬俶俿丵俵俙俿俤偩偗偱偼側偔偰俵俬俶俿丵俠俬俶俶俙俵俷俶傕昞帵偝傟傑偟偨丅
嫟桳僼僅儖僟偵傕傾僋僙僗偱偒傑偡丅
偦偟偰壓偼倂倝値倓倧倵倱俈偱偡丅
偙偪傜傕俵俬俶俿丵俠俬俶俶俙俵俷俶偑昞帵偝傟傑偟偨丅
傎傫偲丅
偁傫側偵擸傫偩偺偑傑傞偱僂僜偺傛偆偱偡丅
偙傟偵偰丅
堦審棊拝両
僷僜僐儞傪偮偔傠偆両乵戞俁俋俁夞乶
俀侽俀俇丏侾丏俀俁倳倫倢倧倎倓
慜傊
師傊
栚師傊栠傞
儂乕儉儁乕僕僩僢僾傊栠傞